I just bought an OAK-D Lite to play around with a bit, and so far it seems pretty neat, but I've noticed a significant amount of noise on the mono cameras that seems especially prominent when looking at darker surfaces. Is this normal for the sensors in the OAD-D Lite? If so, are there any recommendations on how to reduce this noise for better use in depth image calculations?
OAK-D Lite Noisy Mono Camera
- Edited
@jakaskerl I used the Mono Camera Control demo from the documentation, turned the ISO all the way down, and the exposure time to 20500. Looks better, but still seeing noise, especially in the corners, and especially on the left sensor.
Maybe its also just some thermal noise? The thermal pad on my camera does not seem very tacky/sticky, so maybe I just need to replace that to pull heat away from the chip so it does not propagate to the cameras?
- Edited
No. Not really much to blame on thermal issues. I checked the IC temperature, and the output does seem to line up with what the documentation says I should see. So I'm guessing its just the general result of the OV7251's sensor noise.
I decided to do some experiments though, because why not? I captured lots of frames from both mono cameras with both 100 ISO, and 20500 exposure, and them summed them up to see what "hot spots" were generated. Most frames had no hot spots at all, but some did.
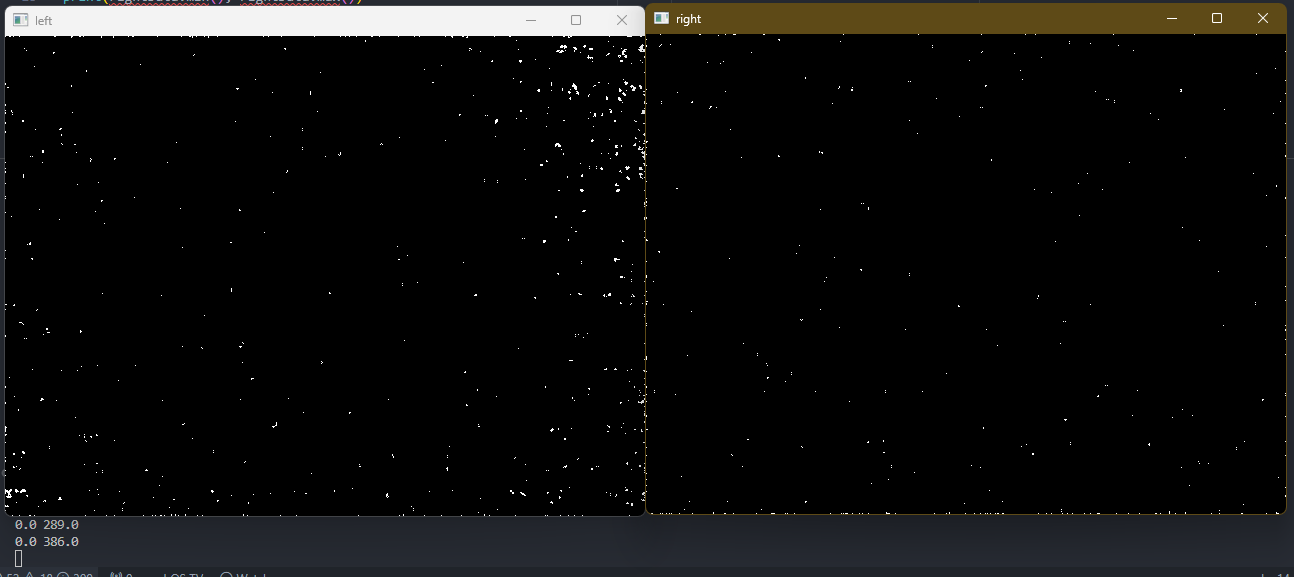
The left camera was a bit "hotter' than the right camera. I'm think that one is closer to the Myriad X, so its probably just a little bit more thermal noise.
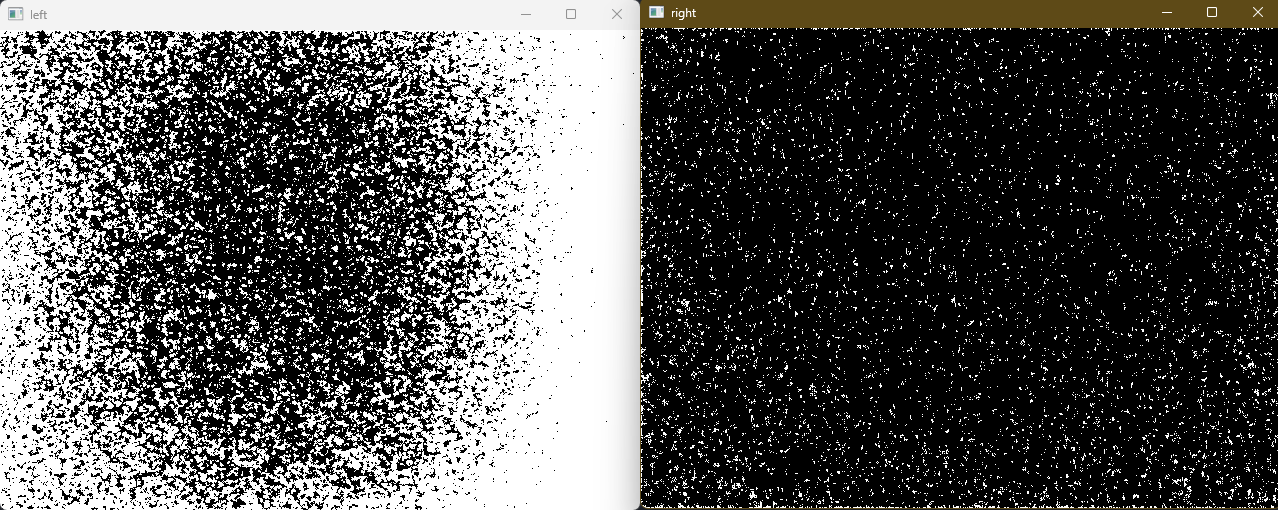
Repeating the same test, but with the highest ISO setting gives similar results, but with many more bright pixels. This makes sense, as high ISO is going to be more sensor gain, and thus a nosier picture.
Here's the code for grabbing all the frames. I just manually stopped it around 700-1000 frames
#!/usr/bin/env python3
from pathlib import Path
import cv2
import depthai as dai
import time
import shutil
# Create pipeline
pipeline = dai.Pipeline()
# Define source and output
monoRight = pipeline.create(dai.node.MonoCamera)
monoLeft = pipeline.create(dai.node.MonoCamera)
xoutRight = pipeline.create(dai.node.XLinkOut)
xoutLeft = pipeline.create(dai.node.XLinkOut)
xoutRight.setStreamName("right")
xoutLeft.setStreamName("left")
# Properties
monoRight.setCamera("right")
monoLeft.setCamera("left")
monoRight.setResolution(dai.MonoCameraProperties.SensorResolution.THE_480_P)
monoLeft.setResolution(dai.MonoCameraProperties.SensorResolution.THE_480_P)
# Linking
monoRight.out.link(xoutRight.input)
monoLeft.out.link(xoutLeft.input)
# Image control
controlIn = pipeline.create(dai.node.XLinkIn)
controlIn.setStreamName('control')
controlIn.out.link(monoRight.inputControl)
controlIn.out.link(monoLeft.inputControl)
# Connect to device and start pipeline
with dai.Device(pipeline) as device:
# Output queue will be used to get the grayscale frames from the output defined above
qRight = device.getOutputQueue(name="right", maxSize=4, blocking=False)
qLeft = device.getOutputQueue(name="left", maxSize=4, blocking=False)
# Queue for sending sensor config
controlQueue = device.getInputQueue(controlIn.getStreamName())
dirName_l = "mono_data_l"
dirName_r = "mono_data_r"
shutil.rmtree(dirName_l)
shutil.rmtree(dirName_r)
Path(dirName_l).mkdir(parents=True, exist_ok=True)
Path(dirName_r).mkdir(parents=True, exist_ok=True)
while True:
ctrl = dai.CameraControl()
ctrl.setManualExposure(20500, 1600)
controlQueue.send(ctrl)
inRight = qRight.get() # Blocking call, will wait until a new data has arrived
inLeft = qLeft.get()
# Data is originally represented as a flat 1D array, it needs to be converted into HxW form
# Frame is transformed and ready to be shown
cv2.imshow("right", inRight.getCvFrame())
cv2.imshow("left", inLeft.getCvFrame())
# After showing the frame, it's being stored inside a target directory as a PNG image
cv2.imwrite(f"{dirName_r}/{int(time.time() * 1000)}.png",
inRight.getFrame())
cv2.imwrite(f"{dirName_l}/{int(time.time() * 1000)}.png",
inLeft.getFrame())
if cv2.waitKey(1) == ord('q'):
break
And here's the script that summed up the data.
from pathlib import Path
import cv2
import numpy as np
from PIL import Image
def stack_dir(directory: str) -> np.array:
frame = np.zeros((480, 640), dtype=np.float32)
files = list(Path(directory).glob("*.png"))
print(f"{directory}: {len(files)}")
for image in files:
loaded = np.asarray(Image.open(image), np.float32)
frame += loaded
return frame.astype(np.float32)
leftData = stack_dir("mono_data_l")
rightData = stack_dir("mono_data_r")
print(leftData.min(), leftData.max())
print(rightData.min(), rightData.max())
cv2.imshow("left", leftData)
cv2.imshow("right", rightData)
cv2.waitKey()
The noise seems fairly random in how its distributed, so I'm thinking if I really wanted to try it (and frankly, the depth data is pretty good, so this is all somewhat academic at this point), the simplest way might be to average out a few frames (likely using some logic running on the SHAVE cores), then pass that average into the depth calculations. Is that possible, or does the StereoDepth node require the original images?
I can't really say if its better or worse due to this, as I don't really have a frame of reference. I just bought the camera, and was playing around with it when I noticed the noise, so I decided to post to see if that sort of noise against darker surfaces was to be expected or not for the mono cameras on the OAK-D Lite.
As for the averaging and such, I was just thinking aloud about possible ways to push the limits of what's possible :-)
Here's a quick sample I put together with a little test setup. Upper images are left and right cameras, lower is color and the disparity map. The data looks pretty good to me on the depth side. Consistent around objects that are easily discernable from the stereo pair, and noisy on smooth surfaces
This is a close up of a dark keyboard on a dark table, like from my original post, so you can see the sensor noise due to a high ISO again. The camera is really close to the keyboard, and there's not a lot of features, so the depth data is not great.
And here's the program I used to generate the images. Its a modified version of the depth_preview example from the docs.
import cv2
import depthai as dai
import numpy as np
# Closer-in minimum depth, disparity range is doubled (from 95 to 190):
extended_disparity = False
# Better accuracy for longer distance, fractional disparity 32-levels:
subpixel = False
# Better handling for occlusions:
lr_check = True
# Create pipeline
pipeline = dai.Pipeline()
# Color RGB data
rgb = pipeline.createColorCamera()
rgb.setPreviewSize(640, 480)
rgb_out = pipeline.createXLinkOut()
rgb_out.setStreamName("rgb")
rgb.preview.link(rgb_out.input)
# Define sources and outputs
monoLeft = pipeline.create(dai.node.MonoCamera)
monoRight = pipeline.create(dai.node.MonoCamera)
xoutLeft = pipeline.create(dai.node.XLinkOut)
xoutRight = pipeline.create(dai.node.XLinkOut)
depth = pipeline.create(dai.node.StereoDepth)
xout = pipeline.create(dai.node.XLinkOut)
xoutLeft.setStreamName('left')
xoutRight.setStreamName('right')
xout.setStreamName("disparity")
# Properties
monoLeft.setResolution(dai.MonoCameraProperties.SensorResolution.THE_480_P)
monoLeft.setCamera("left")
monoRight.setResolution(dai.MonoCameraProperties.SensorResolution.THE_480_P)
monoRight.setCamera("right")
# Create a node that will produce the depth map (using disparity output as it's easier to visualize depth this way)
depth.setDefaultProfilePreset(dai.node.StereoDepth.PresetMode.HIGH_DENSITY)
# Options: MEDIAN_OFF, KERNEL_3x3, KERNEL_5x5, KERNEL_7x7 (default)
depth.initialConfig.setMedianFilter(dai.MedianFilter.KERNEL_7x7)
depth.setLeftRightCheck(lr_check)
depth.setExtendedDisparity(extended_disparity)
depth.setSubpixel(subpixel)
# Linking
monoLeft.out.link(depth.left)
monoRight.out.link(depth.right)
monoLeft.out.link(xoutLeft.input)
monoRight.out.link(xoutRight.input)
depth.disparity.link(xout.input)
# Connect to device and start pipeline
with dai.Device(pipeline) as device:
# Output queue will be used to get the disparity frames from the outputs defined above
q = device.getOutputQueue(name="disparity", maxSize=4, blocking=False)
q_rgb = device.getOutputQueue(name="rgb", maxSize=4, blocking=False)
q_left = device.getOutputQueue(name="left", maxSize=4, blocking=False)
q_right = device.getOutputQueue(name="right", maxSize=4, blocking=False)
while True:
in_rgb = q_rgb.get()
rgb = in_rgb.getCvFrame()
in_left = q_left.get()
left = in_left.getCvFrame()
in_right = q_right.get()
right = in_right.getCvFrame()
inDisparity = q.get() # blocking call, will wait until a new data has arrived
frame = inDisparity.getFrame()
# Normalization for better visualization
frame = (frame * (255 / depth.initialConfig.getMaxDisparity())
).astype(np.uint8)
# Available color maps: https://docs.opencv.org/3.4/d3/d50/group__imgproc__colormap.html
frame = cv2.applyColorMap(frame, cv2.COLORMAP_JET)
mono_concat = np.concatenate((left, right), axis=1)
mono_concat = np.dstack([mono_concat]*3)
depth_concat = np.concatenate((rgb, frame), axis=1)
full_frame = np.concatenate((mono_concat, depth_concat), axis=0)
cv2.imshow("data", full_frame)
if cv2.waitKey(1) == ord('q'):
break
@jakaskerl I'm pretty sure sure the smudging is because right before I took that, my finger slipped and I left a fingerprint on the body's glass.
Just in case, here's the MXID: 1944301091EB5C1300
marsfan
Ok, makes sense. Can't find factory logs either, looks like its a device from an older batch. If you are not satisfied with the quality we can replace the device (support@luxonis.com).
Thanks,
Jaka
@jakaskerl In that case, I think I will reach out to them and see what I can do. Thanks for helping me out.