Hello,
I’m currently working on a project using the OAK-D Pro PoE to detect sitting people in farmland with 99% accuracy.
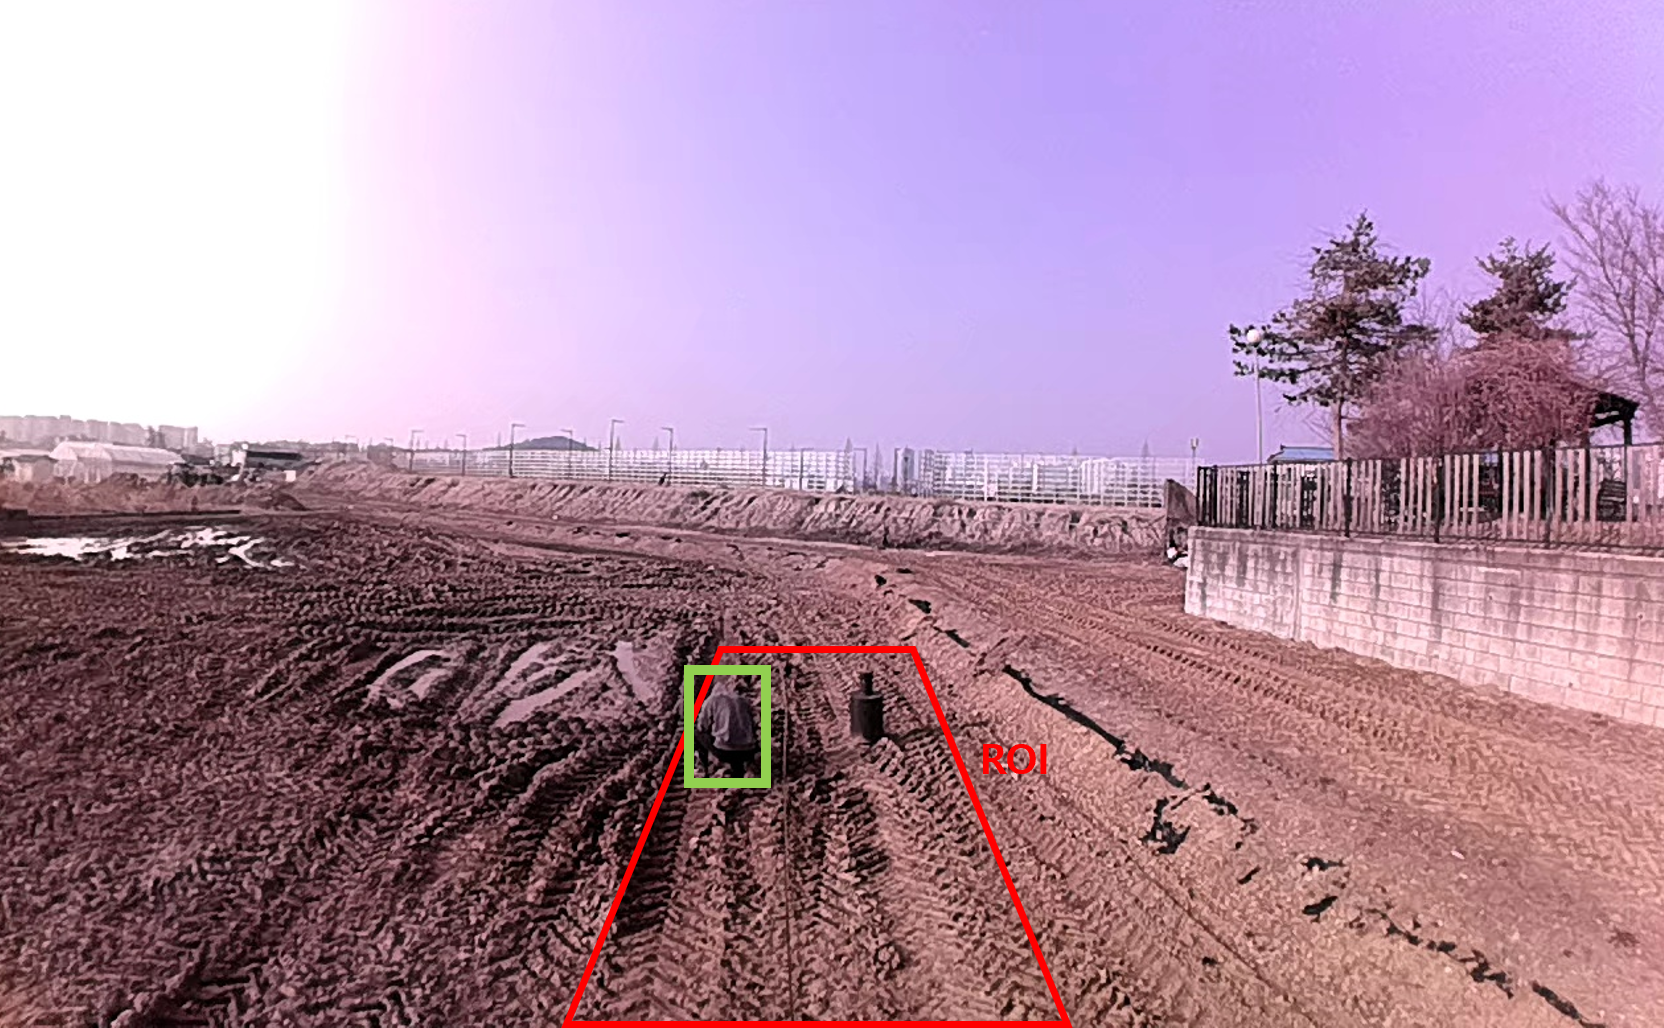
As shown in the image below, when using the OAK-D Pro Wide PoE, the camera captures significantly more information than my defined ROI (3m wide, 10m long), resulting in the person within the ROI appearing too small. This issue was partially resolved by switching to the OAK-D Pro (non-wide version).

However, I encountered another issue: while standing people are detected well, sitting people are not.
Even when the person wears clothes with a color that contrasts with the soil, detection still fails.
The AI model I used is not custom-trained but the provided yolov8n_coco_640x352.blob from examples/models.
The code I used is as follows:
#!/usr/bin/env python3
from pathlib import Path
import sys
import cv2
import depthai as dai
import numpy as np
import time
'''
Spatial Tiny-yolo example
Performs inference on RGB camera and retrieves spatial location coordinates: x,y,z relative to the center of depth map.
Can be used for tiny-yolo-v3 or tiny-yolo-v4 networks
'''
# Get argument first
nnBlobPath = str((Path(__file__).parent / Path('../models/yolov8n_coco_640x352.blob')).resolve().absolute())
if 1 < len(sys.argv):
arg = sys.argv[1]
if arg == "yolo3":
nnBlobPath = str((Path(__file__).parent / Path('../models/yolo-v3-tiny-tf_openvino_2021.4_6shave.blob')).resolve().absolute())
elif arg == "yolo4":
nnBlobPath = str((Path(__file__).parent / Path('../models/yolo-v4-tiny-tf_openvino_2021.4_6shave.blob')).resolve().absolute())
else:
nnBlobPath = arg
else:
print("Using Tiny YoloV4 model. If you wish to use Tiny YOLOv3, call 'tiny_yolo.py yolo3'")
if not Path(nnBlobPath).exists():
import sys
raise FileNotFoundError(f'Required file/s not found, please run "{sys.executable} install_requirements.py"')
# Tiny yolo v3/4 label texts
labelMap = [
"person"
]
syncNN = True
# Create pipeline
pipeline = dai.Pipeline()
# Define sources and outputs
camRgb = pipeline.create(dai.node.ColorCamera)
spatialDetectionNetwork = pipeline.create(dai.node.YoloSpatialDetectionNetwork)
monoLeft = pipeline.create(dai.node.MonoCamera)
monoRight = pipeline.create(dai.node.MonoCamera)
stereo = pipeline.create(dai.node.StereoDepth)
nnNetworkOut = pipeline.create(dai.node.XLinkOut)
xoutRgb = pipeline.create(dai.node.XLinkOut)
xoutNN = pipeline.create(dai.node.XLinkOut)
xoutDepth = pipeline.create(dai.node.XLinkOut)
xoutRgb.setStreamName("rgb")
xoutNN.setStreamName("detections")
xoutDepth.setStreamName("depth")
nnNetworkOut.setStreamName("nnNetwork")
# Properties
camRgb.setPreviewSize(640, 352)
camRgb.setResolution(dai.ColorCameraProperties.SensorResolution.THE_1080_P)
camRgb.setInterleaved(False)
camRgb.setColorOrder(dai.ColorCameraProperties.ColorOrder.BGR)
monoLeft.setResolution(dai.MonoCameraProperties.SensorResolution.THE_400_P)
monoLeft.setCamera("left")
monoRight.setResolution(dai.MonoCameraProperties.SensorResolution.THE_400_P)
monoRight.setCamera("right")
# setting node configs
stereo.setDefaultProfilePreset(dai.node.StereoDepth.PresetMode.HIGH_DENSITY)
# Align depth map to the perspective of RGB camera, on which inference is done
stereo.setDepthAlign(dai.CameraBoardSocket.CAM_A)
stereo.setOutputSize(monoLeft.getResolutionWidth(), monoLeft.getResolutionHeight())
stereo.setSubpixel(True)
spatialDetectionNetwork.setBlobPath(nnBlobPath)
spatialDetectionNetwork.setConfidenceThreshold(0.5)
spatialDetectionNetwork.input.setBlocking(False)
spatialDetectionNetwork.setBoundingBoxScaleFactor(0.5)
spatialDetectionNetwork.setDepthLowerThreshold(100)
spatialDetectionNetwork.setDepthUpperThreshold(12000)
# Yolo specific parameters
spatialDetectionNetwork.setNumClasses(1)
spatialDetectionNetwork.setCoordinateSize(4)
spatialDetectionNetwork.setAnchors([10,14, 23,27, 37,58, 81,82, 135,169, 344,319])
spatialDetectionNetwork.setAnchorMasks({ "side26": [1,2,3], "side13": [3,4,5] })
spatialDetectionNetwork.setIouThreshold(0.5)
# Linking
monoLeft.out.link(stereo.left)
monoRight.out.link(stereo.right)
camRgb.preview.link(spatialDetectionNetwork.input)
if syncNN:
spatialDetectionNetwork.passthrough.link(xoutRgb.input)
else:
camRgb.preview.link(xoutRgb.input)
spatialDetectionNetwork.out.link(xoutNN.input)
stereo.depth.link(spatialDetectionNetwork.inputDepth)
spatialDetectionNetwork.passthroughDepth.link(xoutDepth.input)
spatialDetectionNetwork.outNetwork.link(nnNetworkOut.input)
# Connect to device and start pipeline
with dai.Device(pipeline) as device:
# Output queues will be used to get the rgb frames and nn data from the outputs defined above
previewQueue = device.getOutputQueue(name="rgb", maxSize=4, blocking=False)
detectionNNQueue = device.getOutputQueue(name="detections", maxSize=4, blocking=False)
depthQueue = device.getOutputQueue(name="depth", maxSize=4, blocking=False)
networkQueue = device.getOutputQueue(name="nnNetwork", maxSize=4, blocking=False)
startTime = time.monotonic()
counter = 0
fps = 0
color = (255, 255, 255)
printOutputLayersOnce = True
while True:
inPreview = previewQueue.get()
inDet = detectionNNQueue.get()
depth = depthQueue.get()
inNN = networkQueue.get()
if printOutputLayersOnce:
toPrint = 'Output layer names:'
for ten in inNN.getAllLayerNames():
toPrint = f'{toPrint} {ten},'
print(toPrint)
printOutputLayersOnce = False
frame = inPreview.getCvFrame()
depthFrame = depth.getFrame() # depthFrame values are in millimeters
depth_downscaled = depthFrame[::4]
if np.all(depth_downscaled == 0):
min_depth = 0 # Set a default minimum depth value when all elements are zero
else:
min_depth = np.percentile(depth_downscaled[depth_downscaled != 0], 1)
max_depth = np.percentile(depth_downscaled, 99)
depthFrameColor = np.interp(depthFrame, (min_depth, max_depth), (0, 255)).astype(np.uint8)
depthFrameColor = cv2.applyColorMap(depthFrameColor, cv2.COLORMAP_HOT)
counter+=1
current_time = time.monotonic()
if (current_time - startTime) > 1 :
fps = counter / (current_time - startTime)
counter = 0
startTime = current_time
detections = inDet.detections
# If the frame is available, draw bounding boxes on it and show the frame
height = frame.shape[0]
width = frame.shape[1]
for detection in detections:
roiData = detection.boundingBoxMapping
roi = roiData.roi
roi = roi.denormalize(depthFrameColor.shape[1], depthFrameColor.shape[0])
topLeft = roi.topLeft()
bottomRight = roi.bottomRight()
xmin = int(topLeft.x)
ymin = int(topLeft.y)
xmax = int(bottomRight.x)
ymax = int(bottomRight.y)
cv2.rectangle(depthFrameColor, (xmin, ymin), (xmax, ymax), color, 1)
# Denormalize bounding box
x1 = int(detection.xmin * width)
x2 = int(detection.xmax * width)
y1 = int(detection.ymin * height)
y2 = int(detection.ymax * height)
try:
label = labelMap[detection.label]
except:
label = detection.label
cv2.putText(frame, str(label), (x1 + 10, y1 + 20), cv2.FONT_HERSHEY_TRIPLEX, 0.5, 255)
cv2.putText(frame, "{:.2f}".format(detection.confidence*100), (x1 + 10, y1 + 35), cv2.FONT_HERSHEY_TRIPLEX, 0.5, 255)
cv2.putText(frame, f"X: {int(detection.spatialCoordinates.x)} mm", (x1 + 10, y1 + 50), cv2.FONT_HERSHEY_TRIPLEX, 0.5, 255)
cv2.putText(frame, f"Y: {int(detection.spatialCoordinates.y)} mm", (x1 + 10, y1 + 65), cv2.FONT_HERSHEY_TRIPLEX, 0.5, 255)
cv2.putText(frame, f"Z: {int(detection.spatialCoordinates.z)} mm", (x1 + 10, y1 + 80), cv2.FONT_HERSHEY_TRIPLEX, 0.5, 255)
cv2.rectangle(frame, (x1, y1), (x2, y2), color, cv2.FONT_HERSHEY_SIMPLEX)
cv2.putText(frame, "NN fps: {:.2f}".format(fps), (2, frame.shape[0] - 4), cv2.FONT_HERSHEY_TRIPLEX, 0.4, color)
cv2.imshow("depth", depthFrameColor)
cv2.imshow("rgb", frame)
if cv2.waitKey(1) == ord('q'):
break
❓ Questions:
I would like to improve the detection rate of sitting people by modifying the Python code.
Which parameters should I change among:
setConfidenceThreshold(0.5)
setBoundingBoxScaleFactor(0.5)
setIouThreshold(0.5)
to help detect sitting people more reliably?
Is it possible to modify the code to increase the number of pixels used to detect sitting people?
(e.g., by zooming into the ROI or adjusting the camera view?)
Can I adjust brightness or exposure of the camera through the code?
If there are any other methods to improve detection of sitting people using YOLOv8n, even if not mentioned above, I’d really appreciate your advice.
Thank you!
(For reference, I also tested with YOLOv11n, but the detection accuracy was not significantly better—both models failed to detect sitting people reliably.)